Wednesday, May 6, 2009

18th Annual Pacific Coast Traditional Challenge

This past weekend found the gang up at Conejo Valley Archers in Simi Valley, CA to participate in one of the best traditional archery shoots of the year. I may get disagreement from some people but I find this to be *the* best trad shoot of the year.

This is a two day shoot over Saturday and Sunday. The club has been able to make arrangements for special camping fees at a county park right next to the range. This year little miss ranger must have gotten the word because we didn't seem to have any problems with her. Last year her supervisors neglected to tell her of the special prices and she was about ready to lock us all up before a CVA officer saved the day.

Over the years this shoot's format has changed a bit as the club tries different things. This year it was 50 3D targets. There were also some novelty shoots with a seperate entry fee but the opportunity to win part of your fee back if you shoot well. On the regular targets we shot 30 targets on Saturday and the remaining 20 on Sunday. There was a smoker round on Saturday that drew a pretty good crowd.

I shot with a great bunch of folks and everyone had a great time. Tom Mills got permission to use his atlatl and darts in place of a bow and as I predicted, he threw his 7' bamboo and cane darts better than I shot with my bow and matched arrows.

Here is Ken getting ready to rain doom on a hapless foam animal. Ken likes heavier bows and it's fun to see his big arrows rock the target back.


Salvador lets one fly as Aimee, Phil, and bit of Ken look on. Salvador is a great person to spend time with. I am forever in his debt for the things he has taught me. Things like, "You'll shoot better if you come to full draw and anchor before loosing the arrow..."


Here's Tom on that same target, getting ready to show us all how it's done.


This is a fun shot. All you have to do is shoot under the rope. You can lay on your back, your stomach, or try to kneel low enough to get an arrow under the rope and into the target. Phil elected to lay on his back and he did pretty well.


Yeah, here's Tom again showing off his form. Carl looks like he's about to tip over with the amazement of it all.


This is a really fun target. One of the club members hides behind a piece of plywood and tosses up foam disks for us to shoot at. Guess how Tom did...

I didn't get any pictures the second day. Fayme took a few while she manned a craft and face painting booth she put up. Here is the link to her Flickr pictures for Conejo Traditional Archery Shoot.

Thanks for a great shoot, CVA. I'm ready for next year!

Sunday, March 1, 2009

An Arrow Art Build-Along

I got a request recently for direction on how I do some of the art I use on arrows. I sent the gentleman a pretty detailed email but didn't have any pictures to include. I spent some time today taking a series of pictures for three different techniques that I'll post here.
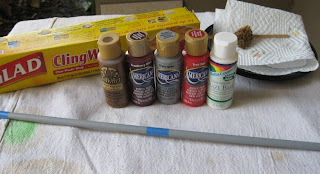
Here are the supplies and tools I'll use for this series. We've got an arrow shaft that I've already coated with grey paint for a base, three different paint colors, glaze, plastic wrap, a sea sponge, and a plate to mix the paint on.


First, I'll show a simple technique using just the base color and a top color that is mixed with glaze.
Glaze is a paint extender, it slows the drying time and in some instances can change the color a bit. In this application I used a light glaze instead of the transparent glaze I intended to use. By the time I realized I'd grabbed the wrong glaze I was too far along to stop and go get the right one.
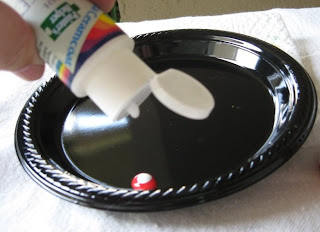
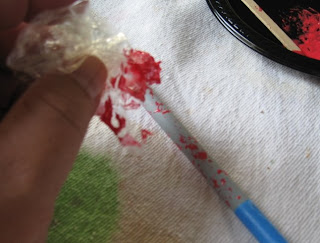
For this application I'm mixing paint and glaze 1:1. After mixing the two together I take a little wad of plastic wrap from the kitchen and dab it into the paint/glaze mix. Dab most of the paint off on a paper towel and then randomly dab it on the arrow shaft. Move the plastic wrap around to maximize the random factor. You can put on as much or as little as you wish.


For the next technique I won't use glaze, just the paint. With this one two colors are used in addition to the base coat color.
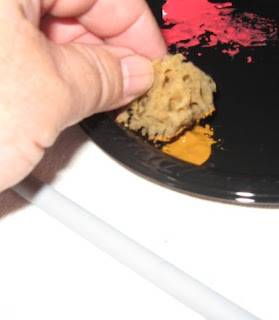
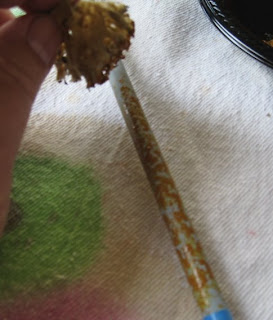
With a dampened sea sponge the first color is dabbed onto the shaft in a random manner. As you do this turn the sponge around in your hand. Just as in the previous technique, get the paint on the sponge and then take most of it off on a paper towel so you don't get too much paint on the shaft. Most of the base color should be covered over but some will still show through.


After the first color is dry, do the second color in the same manner. To help blend the colors and make softer edges you can lightly mist the shaft with water before putting on each of the two colors.

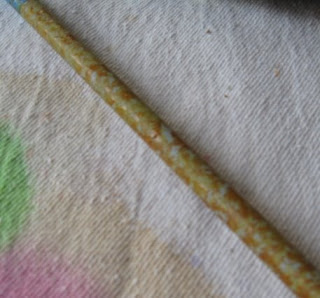
The effect will look different depending upon which color you do first and the other second. With the two colors I chose there was little difference. If you'll look back through arrows pictures I've posted here you'll see some done with brown paints that look like a dirt camo one way and kind of sand camo the other. Be sure to do what I didn't do today: test your colors before starting the project.

The last technique is kind of interesting. This time we'll mix the paint and glaze at about a 1:5 ratio, 1 part paint to 5 parts glaze. Use the sea sponge to get the paint/glaze mixture on most of the shaft and while it is still wet, wrap it in plastic wrap. Wrap it rather snug. After a few moments, unwrap it and you'll see the plastic pull off some of the paint mix and leave behind an interesting texture.
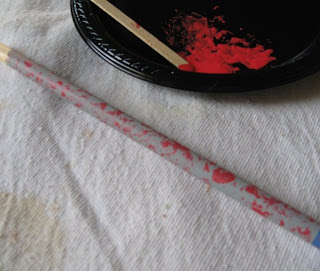
Here are pictures of all three techniques, and of the bottle of glaze I meant to use...


My apologies for the quality of the pictures. I was trying to shoot with one hand, hold the other hand in the picture, and do it all before the paint dried. I hope you're able to see the process without too much dificulty.

All the paints and glaze are available at craft stores like Michael's, Jo-Anne's, etc. These are the same paints I use for cresting. They are inexpensive, easy to use, and they come in enough colors that always be able to get just what I need.

If you have any questions just let me know.


Saturday, February 28, 2009

Tool Time

I don't remember where I saw it on PaleoPlanet but someone recently made a post about converting a shingle hatchet to a bowmaking hatchet by trimming the head and making it into a bearded hatchet.
That sounded like a pretty neat project so while we were in Quartzsite a few weeks ago I kept an eye out for old shingle hatchets in all the piles of rusty tools and "antiques." I picked up these three.

Today we spent some time at David Brunetta's studio in Laguna Beach, CA and he helped me do the conversion. Actually, all I did was use his metal cutting bandsaw to trim the "beard" out of the two bigger heads and take care of rough shaping. David did the final shaping, polishing, and heat treating.
David had an idea for the smaller hatchet and did some trimming, forging, and welding to make it into a small adze. It's too small for building a dugout canoe but I'm hoping it will work well for bowl making.
As soon as I figure out handles for these three I'll be able to see if the concept has merit.
All in all, I think things turned out pretty well.


David also gave me forging lessons and I really learned a lot:
Hammer control is everything.
Playing with red hot steel gets pretty warm.
It's not as easy as a master like David makes it look.

While the two little knives I pounded out aren't worth public exhibition, I have hopes that future pieces will be better.
David is getting ready to offer forging lessons on a one-on-one basis. If you get the chance to take lessons from him, you won't regret it. He is an absolute artist with hot steel, and a number of other mediums.

Saturday, February 21, 2009

An Arrow Build-Along

A number of years ago I participated in an archery group on Yahoo Groups. To contribute something to the group I put together a simple arrow build-along detailing steps I took to build a basic set of arrows. Some of my practices and methods have changed a little now but the build-along still has great information in it, especially for a new arrow maker wondering what tools to get and how to use them.
After I had finished with the series of posts Fayme volunteered to host the whole series on a free website she had access to. I think the account she created it under is long gone so we can't make any changes or updates, but the site itself is still floating around out there for folks to look at.

Arrow Build-Along

Let me know if you have any questions. I hope you enjoy it.

July 10 update: We just found out that Geocities will be deleting the free website the build-along is hosted on in October, '09. If you wish to do so, this would be a good time to copy any pictures or descriptions to your computer (for your own reference only, please).

Some new arrows

I got these arrows delivered to Jason and Kim last weekend and finally have a chance to get a couple pictures up here. Jason and Kim have been coming to the Pasadena gatherings and are working on their first self bows. Since their new bows do not have shelves we wanted to wrap the leading edge of the feathers so their hands won't be cut as the arrow is loosed.

When wrapping with thread I like to use the Raptor cut because I can trim off a bit of feather from the quill and not change the profile of the feather. If you take a look at Gary's arrows a little further down the page you can see that the shield shape of his fletching has kind of a blunt look to the leading edge from the feather being trimmed for the thread.


Saturday, February 14, 2009

New Arrows For Me... this may be scary...

The world of traditional archery can sometimes be pretty traditional.

Take arrows, for instance…

Arrows typically come by the dozen and each arrow is the same as the next. In a way it makes sense. You can always tell which arrow is yours amongst the others in a target at the local shoot. Many times the cock feather is different from the two hen feathers so a visual clue is there when nocking the arrow. The two hen feathers will always be the same.

Something about all this sameness has always kind of gnawed at the back of my mind.
So I decided to do something about it.

I had this bundle of cedar shafts I’d purchased on eBay that I finally got around to spining and weighing and I took out a set of shafts for my new arrows.
I wanted a design that showed all the arrows were in the same set, but in which each arrow was unique, unlike any other arrow in the set.
I call these the Harlequin arrows. I think they came out pretty good.


I decided not to specify which feather was the cock feather because I use Bohning index nocks. With these nocks I find that orienting the arrow to the string is something my fingers do without any help from my eyes.

This set of arrows can be seen as a pretty radical departure from tradition.

Tell me what you think.
Do you hate them?
Do you like them?
Do you think I’m some kind of whacked out artist?
Or do you think I’m a ground breaking visionary?

Sunday, February 1, 2009

Bucket Brigade

Fayme and I decided to spend some time out in Quartzsite, Arizona this weekend. At this time of year they have a bunch of flea market-type events going on throughout the town. While they are mainly concentrated on gems and minerals you can also find all kinds of other stuff from antiques to motor home accessories... lots of fun.
We left Friday night after I got home from work. I gathered together the last minute stuff, we packed things into the truck, and off we went.
I've found really great utility in empty cat litter buckets for carrying odds and ends for camping. This time I had a bucket with a few snack foods, some ammunition, flashlights, and wet wipes for cleaning up. While I was getting something into the back of the truck Fayme came out with a couple more items and said she couldn't get the bucket out to me, it was too heavy. I know what I put into it and I'm thinking that it wasn't very heavy so I don't know what her problem was. I go to the apartment porch, bend down to grab the bucket handle and holy crap, this thing weights a ton! How did it get so heavy?! I lug it out to the truck, set it on the ground and prepare to hoist it into the bed. Then I see another bucket already in the bed and suddenly remember already bringing a bucket out. Once I got done laughing I clued Fayme into the joke. Can you already see what happened?

Here are the two buckets:
Here is what was inside the two buckets:
That's right, I carted a 40lb bucket of cat litter out to the truck. No wonder she couldn't lift it. Hope I don't make that mistake too often!
We had a great time in Quartzsite. I brought home 60lbs of obsidian and a few pounds of chert for knapping. I'm not very good at it right now so this stuff will help me get just that much better. The obsidian was $.50 a pound so I was pretty pleased at that. I got one piece of bloodstone jasper that will someday make a very beautiful arrowhead, if I don't screw it up first.
The weather couldn't have been better. Daytime temps were on the warm side and night time was just cold enough that a campfire and the sleeping bag were just great.